
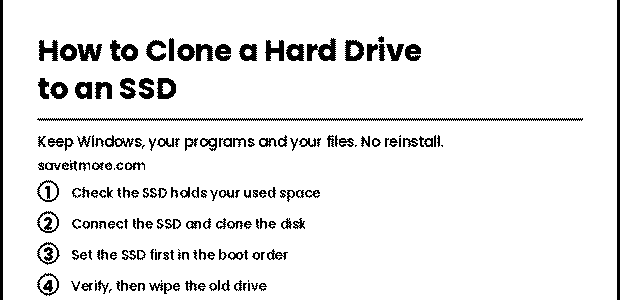

Learning how to clone a hard drive to an SSD is the difference between a thirty-minute upgrade and a lost weekend reinstalling Windows, hunting for licence keys and reconfiguring every program you own. A clone copies the whole disk — operating system, programs, settings, files — so the SSD boots exactly as the old drive did, only far faster.
This guide covers what to check before you start, the actual steps, and the four reasons a clone fails to boot afterwards. Most failures come from one of those four, and all of them are avoidable.
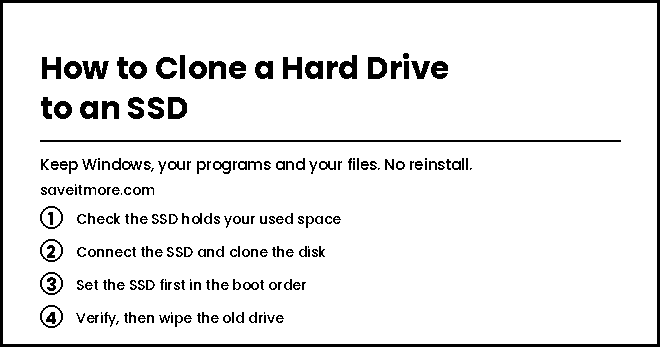
Clone or fresh install: which do you actually want?
Worth two minutes of thought, because cloning is not always the right answer.
Clone when your current Windows install is healthy and you simply want it faster. You keep everything, and you are done in an hour.
Fresh install when the machine is already slow, crash-prone or cluttered after years of use. Cloning copies the problems along with everything else — a corrupted install stays corrupted on the new drive. If Windows has been misbehaving, the SSD upgrade is a good excuse to start clean.
For most people the answer is clone. A drive that is simply full or simply old is not the same as a broken Windows install.
Clone versus image: not the same thing
These two words get used interchangeably and they should not be.
A clone writes a directly usable copy onto the target disk. Swap the drives and the machine boots. There is no intermediate file.
An image is a compressed backup file that has to be restored before it can be used. Images are better for backups — you can keep several, they take less space, and you can restore individual files. Clones are better for migrations, which is what this is.
For an SSD upgrade you want a clone. Keep imaging for your ongoing backup routine.
What to check before you start
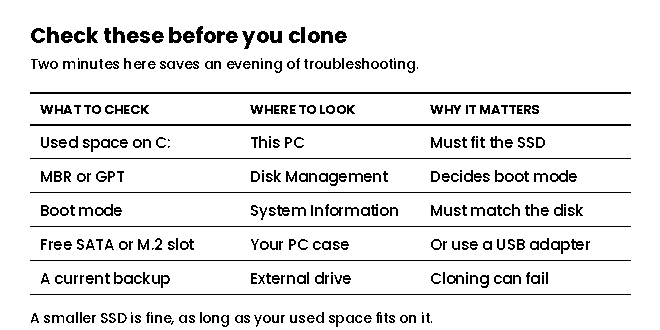
Used space, not total space. This is the one that surprises people: your SSD can be smaller than your hard drive. Cloning software copies used sectors rather than empty ones, so a 1TB drive holding 300GB of data clones comfortably onto a 500GB SSD. Open This PC and read the used figure on C:, not the drive size.
MBR or GPT. Right-click Start, open Disk Management, right-click your disk, choose Properties, then the Volumes tab. The partition style is listed there. Note it down.
Your boot mode. Press Windows+R, type msinfo32, and look at “BIOS Mode”. It will say Legacy or UEFI. This has to match the partition style — Legacy goes with MBR, UEFI goes with GPT. A mismatch is the single most common reason a cloned drive will not boot.
How you will connect the SSD. A desktop usually has a spare SATA port. A laptop generally has one bay, so you need a USB-to-SATA adapter or an M.2 enclosure to hold the SSD during the clone, then swap the drives afterwards.
A backup. Cloning is generally safe, but you are about to run disk-level software with your only copy of everything attached. Back up anything irreplaceable to a separate drive or to cloud storage first. This takes ten minutes and removes the only scenario where this goes badly wrong.
How to clone a hard drive to an SSD: the steps
1. Clean up first
Every gigabyte you delete now is one you do not have to copy. Empty the Recycle Bin, run Disk Cleanup (including “Clean up system files”), uninstall programs you no longer use, and move large media folders to an external drive if the SSD is tight on space.
This step matters most when you are moving to a smaller SSD, but it shortens the clone either way.
2. Connect the SSD and initialise it
Fit the SSD internally, or connect it through your USB adapter. Open Disk Management. A brand-new drive will prompt you to initialise it — choose the same partition style your source disk uses, GPT or MBR, as noted earlier.
If the drive does not appear at all, try a different cable or port before assuming it is faulty. Adapter cables are a common culprit.
3. Run the clone
Open your cloning software and choose disk clone rather than partition clone — you want the whole disk, including the hidden boot and recovery partitions, not just C:.
Select the hard drive as source and the SSD as target. Read the warning: the target will be completely erased. Check twice that you have them the right way round, because this is the one mistake that is not recoverable.
If the software offers an “SSD alignment” or “optimise for SSD” option, enable it. If it offers to resize partitions to fill the target, enable that too when moving to a larger drive.
Then start it and leave it alone. A few hundred gigabytes over USB can take an hour or more. Do not use the machine for anything demanding while it runs.
4. Set the SSD as the boot drive
When the clone finishes, shut down. If you used an adapter, now is the moment to physically swap the drives.
Restart and enter the BIOS or UEFI setup — usually F2, F10, F12 or Delete during startup, depending on the manufacturer. Find the boot order and put the SSD first. Save and exit.
Windows should start normally, and noticeably faster.
5. Verify before you erase anything
Do not wipe the old drive yet. Boot from the SSD and actually check: open your documents, launch the programs you rely on, confirm Windows is activated under Settings, and make sure nothing is missing.
Give it a few days of normal use. Only once you are confident should you format the old drive and repurpose it as secondary storage — which, being an ordinary hard drive, is exactly what it is good for.
Four things that go wrong
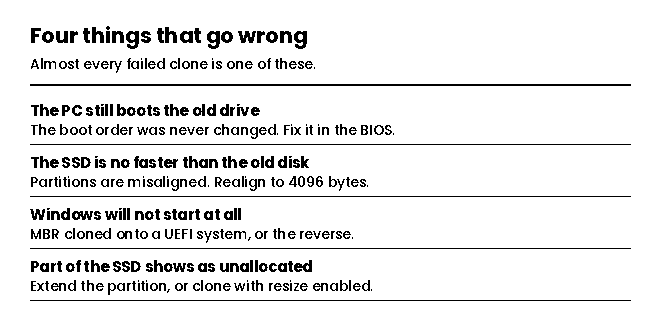
The PC still boots from the old drive. The most common and least serious problem. The clone worked; the BIOS is simply still pointing at the original disk. Change the boot order. If both drives are connected and you cannot tell which is which, disconnect the old one temporarily to confirm the SSD boots on its own.
The SSD is no faster than the old hard drive. Usually partition misalignment. SSDs read and write in 4096-byte pages, and a partition that does not start on a 4096-byte boundary forces every write to touch two pages instead of one. Good cloning software aligns automatically; if yours did not, a partition tool can realign it without data loss.
Windows will not start at all. Almost always the MBR/GPT and Legacy/UEFI mismatch described earlier. An MBR disk cloned onto a machine set to UEFI will not boot, and the reverse is equally true. Some tools can convert the partition style without data loss; otherwise clone again with matching settings.
Part of the SSD shows as unallocated. Harmless but wasteful — it happens when you clone to a larger drive without resizing. Open Disk Management, right-click the C: partition and choose Extend Volume to absorb the free space. If Extend Volume is greyed out, the unallocated space is not directly to the right of C: and you will need a partition tool to move it.
After the upgrade: how to treat an SSD
SSDs need less maintenance than hard drives, but the advice differs in a couple of important ways.
Never defragment an SSD. Defragmentation exists to reduce mechanical seek time, which an SSD does not have. All it does is add unnecessary writes. Windows recognises SSDs and runs TRIM instead — leave the default “Optimise drives” schedule alone and let it do its job.
Leave some free space. SSDs slow down when very full because the controller has less room to shuffle data. Ten to fifteen per cent free is a reasonable target.
Keep backing up. SSDs are more reliable than hard drives in daily use but they fail differently — often suddenly, with less warning than the clicking noises a dying hard drive tends to make. A faster drive is not a backup strategy.
Update the firmware. Most manufacturers publish a small utility that checks drive health and applies firmware updates. Worth running once after installation, then occasionally.
Keeping the cost down
The two costs here are the SSD itself and the software, and only one of them is fixed.
Plenty of cloning tools have a free tier that handles a straightforward disk-to-disk clone perfectly well. Paid versions add things like scheduled backups, resizing during clone, and migrating to dissimilar hardware — useful, but not always necessary for a one-off upgrade. Work out which features you actually need before paying.
If you do want the paid version, this category discounts heavily and often. Our AOMEI coupon codes page lists current offers on backup and partition tools, and the same page explains which edition covers what.
One honest note on buying backup software: lifetime licences are frequently better value than annual ones for home use, since the software does what it does and rarely needs the newest version. And check whether the licence covers one PC or several before assuming.
Frequently asked questions
Can I clone a hard drive to an SSD that is smaller?
Yes, as long as the data currently used on the hard drive fits within the SSD’s capacity. Cloning software copies used sectors, not empty ones. Check the used figure on C:, not the total drive size.
Will I need to reactivate Windows after cloning?
Usually not. Changing the storage drive alone does not normally trigger reactivation, because Windows licences are tied more closely to the motherboard. If it does ask, signing in with the Microsoft account linked to the licence generally resolves it.
How long does cloning take?
Anywhere from twenty minutes to several hours, depending on how much data you have and how the SSD is connected. An internal SATA connection is considerably faster than a USB adapter. Do not interrupt it once started.
Do I have to delete anything from the old drive first?
Only if the used space will not fit on the SSD. Otherwise cleaning up is optional — though it does make the clone quicker.
Can I keep using the old hard drive afterwards?
Yes, and you should. Once you have verified the SSD boots and works properly, format the old drive and use it as secondary storage for media, archives or backups.
What if the clone finishes but Windows will not boot?
Check the boot order first, then check whether your partition style matches your boot mode. Those two account for the overwhelming majority of cases. Your original drive is untouched, so you can always put it back and try again.
The bottom line
The reliable way to clone a hard drive to an SSD is to spend five minutes on the checks before you start: used space, partition style, boot mode, and a backup. Get those right and the clone itself is largely automated.
Then change the boot order, verify everything works, and only afterwards erase the old drive. That last bit of patience is what turns a risky operation into a routine one.
Technical details above follow standard Windows migration practice as documented by AOMEI. Steps vary slightly between cloning tools — check the documentation for the software you actually use.