

If you want to recover deleted files on Windows, the single most important thing is what you do in the next ten minutes — not which software you eventually buy. Deleted data is still physically on the drive until something else is written on top of it, and almost everything you do on a running PC writes something.
This guide covers every way to recover deleted files on Windows, in the order you should actually try them — from free and instant to paid and slow — and is honest about the two situations where no software will help at all.
First: the 60-second triage
Before anything else, work out which of these you are dealing with. The answer changes everything that follows.
- You deleted a file and the drive is fine. Good position. Stop writing to that drive and work down this guide in order.
- You formatted or repartitioned a drive. Recoverable in many cases, but only if nothing has been written since. Do not let Windows “prepare” or index it.
- The drive is making noise, disappearing, or reporting bad sectors. This is hardware. Software cannot help and repeated scanning makes it worse. Skip to the section on data recovery labs.
- The files were encrypted by ransomware. Different problem entirely — recovery software will find the encrypted versions, not your originals. Shadow copies and offsite backups are your only real routes.
Whichever it is, one rule covers all of them: stop writing to the affected drive immediately. Every file Windows saves — a browser cache entry, a log, a temp file, the installer for the recovery software you are about to download — is a chance to land on the sectors holding what you lost.
If the deleted file was on your system drive (C:), that is the drive Windows is writing to constantly. Ideally you shut down, pull the drive, and recover it from another machine using a USB adapter. If that is not practical, at minimum: close everything, do not install anything onto C:, and install the recovery tool onto a USB stick or a second drive.
Where “deleted” files actually go
Understanding this takes two minutes and tells you exactly what is recoverable.
A file on disk is two things: the data (the actual bytes, scattered across the drive) and the index entry (the filesystem record saying “a file called report.docx lives in these locations”). When you delete a file, Windows does not erase the data. It marks the index entry as free and tells the drive those sectors are available for reuse.
So the file is intact until something overwrites it. Recovery software works by scanning the raw drive, finding either the orphaned index entries or recognisable file structures in the free space, and rebuilding files from them. Three consequences follow directly:
- Time matters, but usage matters more. A file deleted a month ago on a drive nobody touched is in better shape than one deleted an hour ago on a busy machine.
- The filename may be gone even when the data is not. Recovered files often come back as
FILE0001.docx. The contents are there; the label was in the index entry. - Big files are more fragile than small ones. A large video is spread across many places, and only one of them needs overwriting for the file to come back corrupted.
Step 1 — The Recycle Bin (and when it is not there)
Obvious, but worth being precise about, because there are several ways files skip it:
- Deleting with Shift+Delete bypasses the bin.
- Files deleted from a USB stick, SD card or network share never go to the bin.
- Files larger than the bin’s size allocation are deleted outright.
- Deleting from Command Prompt, PowerShell or most applications’ own “delete” bypasses it.
- The bin can be configured not to keep files at all.
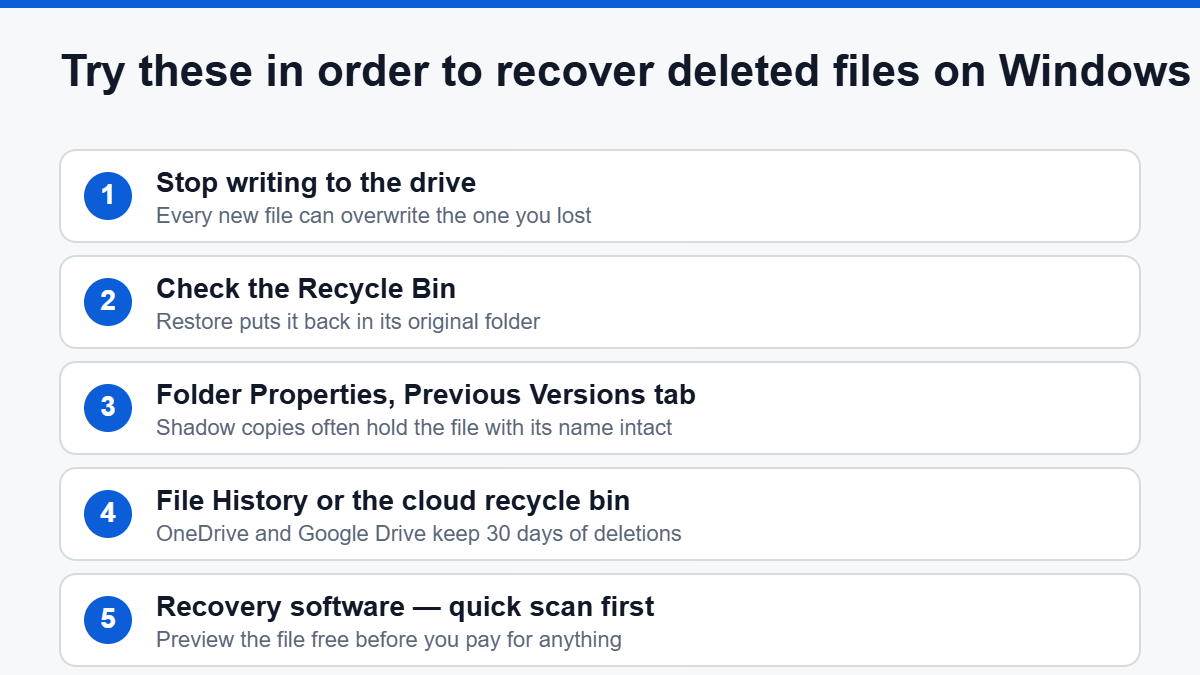
If the file is in the bin, right-click and choose Restore — it goes back to its original folder. If the bin is empty or the file is not there, do not “empty” anything and move on to the next step.
Step 2 — Previous Versions and File History
Windows keeps older copies of files in two different systems that most people never enable and many never check.
Previous Versions
Right-click the folder the file was in, choose Properties, then the Previous Versions tab. If System Protection or File History has been running, you will see dated snapshots of that folder. Open one, and the deleted file may simply be sitting there. Copy it out rather than clicking Restore, so you do not roll the whole folder back.
This works through Volume Shadow Copy, the same mechanism System Restore uses. It is often switched off on a fresh install, which is why so many people find the tab empty — but it costs nothing to check and takes ten seconds.
File History
If File History was set up with an external drive, open Restore your files with File History from the Start menu, browse to the folder, and use the arrows to step back through time. It versions your user folders — Documents, Pictures, Desktop, Downloads — on a schedule.
Both of these are free, both are instant, and both beat any recovery software when they work, because they return the file with its name and its full contents rather than a reconstruction. Microsoft’s own Windows support documentation covers the setup steps if you want to enable them properly afterwards.
Step 3 — OneDrive, Google Drive and the cloud recycle bins
If the folder was synced, the cloud has its own second chance:
- OneDrive keeps deleted files in an online recycle bin for around 30 days, and keeps version history for files edited in place. Sign in through a browser rather than the desktop app — the web bin is the authoritative one.
- Google Drive keeps trashed files for 30 days, and Google Docs formats keep a full revision history.
- Microsoft 365 and Dropbox both keep a second-stage bin that survives the first one being emptied.
Worth saying plainly, because it is the most common misunderstanding in this whole area: sync is not backup. If a file is corrupted or encrypted on your PC, sync copies the damage upward. The recycle bin and version history are what save you there — not the sync itself.
Step 4 — Recovery software: what it can and cannot do
If the free routes came up empty, this is where you reach for a tool. Here is how they actually work, so you can judge the results instead of hoping.
Quick scan vs deep scan
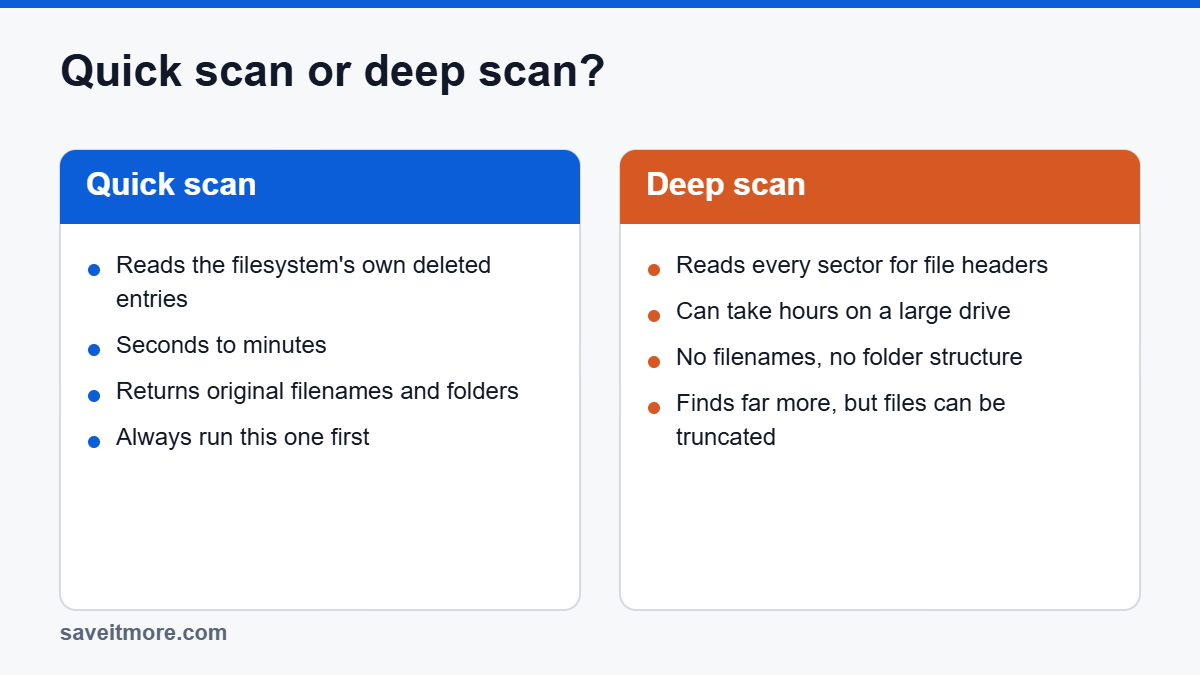
A quick scan reads the filesystem’s own records and finds entries marked deleted but not yet overwritten. It takes seconds to minutes, and when it works you get your files back with their original names and folder structure intact. Always run this first.
A deep scan (sometimes “raw” or “signature” scan) ignores the filesystem entirely and reads every sector on the drive looking for recognisable file headers — the byte patterns that mark the start of a JPEG, a DOCX, an MP4. It can take hours on a large drive. It finds far more, but the results come back without names, without folders, and sometimes truncated, because the header tells the tool where a file starts and not always where it ends.
How to recover deleted files on Windows with recovery software
- Install the tool somewhere other than the affected drive. A USB stick or a second internal drive. Installing onto the drive you are recovering is the classic own goal.
- Select the drive, not a folder. The folder no longer exists as far as the raw scan is concerned.
- Run the quick scan and look at the results before anything else. Filter by file type and by date. If your file is listed, you are almost certainly fine.
- Preview before you pay. Every reputable tool lets you preview recovered files for free. A preview that opens correctly is the only real proof the file is intact. A listed filename is not.
- Recover to a different drive. Writing recovered files back onto the source drive overwrites the very data still being recovered. Every tool warns about this and people still do it.
- Only then run a deep scan, if the quick scan missed it. Let it finish — results appear progressively and the file you want is often found late.
The rule worth repeating: run the free scan and confirm your file is in the results before you spend anything. All the mainstream tools — EaseUS Data Recovery Wizard, Wondershare Recoverit, AOMEI MyRecover and Drecov — scan free and charge only to write the files out. If the scan does not find it, no licence makes it appear.
The SSD problem nobody warns you about
This is the part that surprises people, and it is the reason a technique that worked on your old laptop may fail completely on your new one.
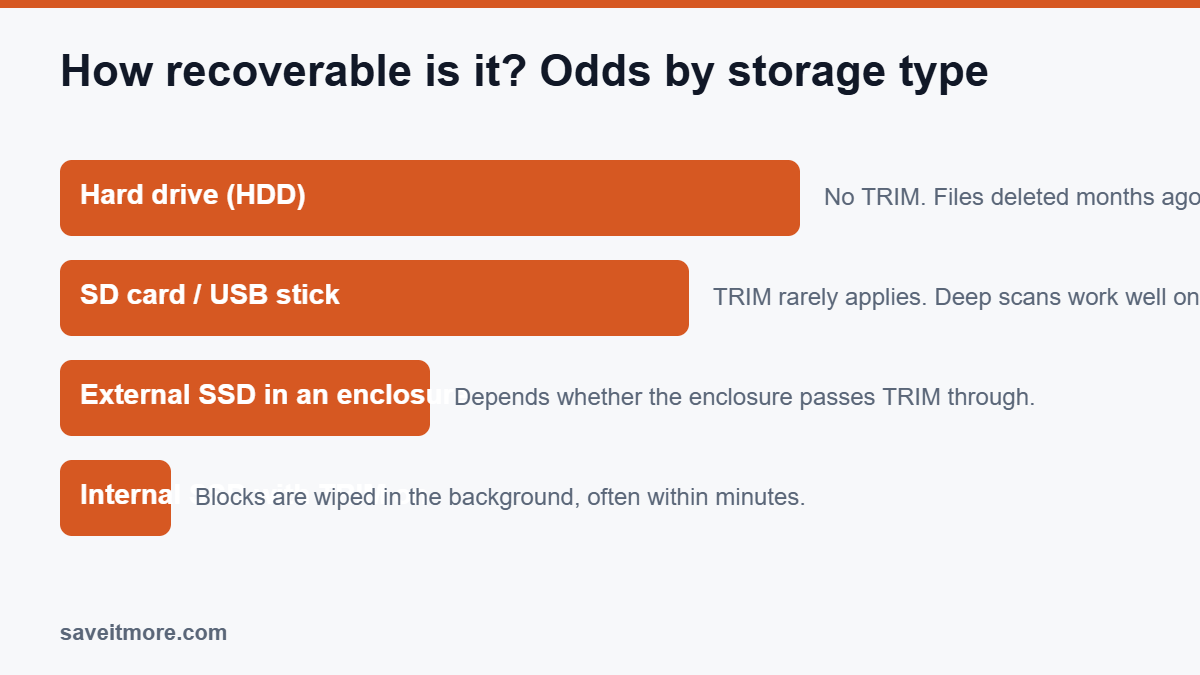
SSDs use a command called TRIM. When you delete a file, Windows tells the SSD which blocks are now free, and the drive’s controller wipes them in the background so it can write to them quickly later. This is good for performance and terrible for recovery: on a TRIM-enabled SSD, deleted data is frequently gone within minutes, permanently, regardless of what software you throw at it.
What this means in practice:
- On an SSD, speed genuinely matters. Power the machine down rather than leaving it idling — TRIM runs in the background even when you are not using the PC.
- A failed scan on an SSD usually means the data is actually gone, not that you picked the wrong tool. Trying four more tools will not change the answer.
- TRIM does not apply to most USB sticks and SD cards, or to external SSDs in enclosures that do not pass the command through. Recovery odds there are much better.
- Conventional hard drives do not have this problem at all. Files deleted months ago are routinely recoverable.
You can check whether TRIM is on by opening an administrator Command Prompt and running fsutil behavior query DisableDeleteNotify. A result of 0 means TRIM is active.
Recovering from SD cards, USB sticks and cameras
Memory cards are the best-case scenario for recovery and the place people most often ruin their own chances.
- Take the card out and leave it out. Do not keep shooting on it, do not let the camera “repair” it.
- Do not format it, even when Windows insists the card needs formatting to be used. That prompt appears when the filesystem is damaged; the photos are usually still there underneath.
- Use a card reader, not the camera’s USB cable. A reader exposes the raw device to the recovery tool; many cameras only expose a filtered file list.
- If the card is write-protected, leave it that way. Read-only is exactly what you want while recovering.
- Expect a deep scan. Camera filesystems damage easily, so signature-based recovery is normal here — and it works well, because photos and videos have very distinctive headers.
One caveat on cheap cards: counterfeit high-capacity cards that report more space than they physically have will produce corrupt files that no recovery tool can fix, because the data was never stored in the first place.
When the drive will not mount at all
If Windows sees the drive but cannot open it — “you need to format this disk”, RAW filesystem, or an access-denied error — the data is often fine and the filesystem is damaged. Two things to try, in this order:
First, image the drive. Before any repair attempt, make a sector-by-sector copy to a healthy drive using an imaging tool, then do all recovery work on the copy. If a repair goes wrong, you still have the original. This is what separates people who get their data back from people who get one attempt.
Then, and only then, consider chkdsk. Running chkdsk /f on a damaged filesystem can fix it — or can consolidate the damage and destroy recoverable data. It is not a first resort, whatever a forum tells you. Run recovery software against the drive first and get out whatever you can.
When to stop and call a data recovery lab
Software recovery assumes the drive can be read. When it cannot, more software is the wrong answer and is actively harmful. Stop and get a professional quote if any of these are true:
- The drive clicks, beeps, grinds or spins up and down repeatedly.
- It appears and disappears in Disk Management, or the capacity is reported wrongly.
- It was dropped while running, or exposed to water, fire or a power surge.
- Scans crash, stall for hours on the same sector, or the drive gets very hot.
- The data is genuinely irreplaceable — the only copies of family photos, a business’s accounts.
Labs are not cheap, and the honest framing is that it is a judgement call about what the data is worth to you rather than an automatic next step. But every additional hour of scanning a failing drive reduces what a lab can recover, so the decision is worth making early rather than after five tools have had a go.
Choosing recovery software: what to actually check
Feature lists in this category are close to identical. These are the things that differ and matter:
| Check | Why it matters |
|---|---|
| Free preview | The only proof your file is genuinely recoverable before you pay. |
| Recovery quota | Some free tiers recover a small amount free; others preview only. Know which you have. |
| Bootable rescue media | Essential if the files are on a system drive that will not boot. |
| Filesystem support | NTFS and FAT32 are universal; exFAT, ReFS, APFS and ext4 are not. |
| RAID and virtual disk support | Only relevant for NAS and server work, and priced accordingly. |
| Licence term | Many recovery licences are annual. For a one-off accident, a one-month licence is often all you need. |
| Refund policy | 30 days is standard. Test your recovery inside that window. |
That last pair matters more than people expect. If you are recovering from a single incident and have no plans to do it again, a monthly licence costs a fraction of a perpetual one and does exactly the same job — Drecov sells monthly, yearly and lifetime tiers specifically for this. If you look after several machines, a technician licence is better value than buying twice.
Making sure this is the last time
Everything above is about how to recover deleted files on Windows after the fact — the expensive, uncertain route. Backup is the cheap, certain one. Now — while the memory of this is fresh — is the moment to set one up.
The minimum worth having on a home PC:
- Turn on File History or System Protection. Free, built in, and it makes the Previous Versions tab work next time.
- One external drive with a scheduled image. An image restores the whole machine, not just documents.
- One copy that is not attached to the PC. Cloud storage, or a second external drive kept elsewhere. This is the copy ransomware cannot reach.
- Test a restore once. An untested backup is a hope, not a backup.
Our guide to choosing Windows backup software you can actually restore from covers how to pick between the free and paid options, and EaseUS vs AOMEI compares the two suites most people end up choosing between.
Frequently asked questions
Can I recover deleted files on Windows after emptying the Recycle Bin?
Yes, in most cases on a conventional hard drive. Emptying the bin only clears the index entry — the data stays on the disk until it is overwritten. Stop using that drive and run a quick scan with recovery software. On an SSD with TRIM enabled, the odds are much worse.
Can I recover files deleted months ago?
On a conventional hard drive, often yes — if the drive has not been heavily used since. On an SSD with TRIM enabled, almost certainly not. The amount of writing that has happened since matters far more than the calendar.
Does free recovery software work?
The scanning engines in free tools are real, and free tiers are genuinely useful for confirming whether your file is recoverable. The limits are usually on how much you can write out, plus missing extras like bootable media. Run a free scan first in every case — it costs nothing and tells you whether paying is worth it.
Why do recovered files have no names?
Because the filename lived in the filesystem index entry, which was reused, while the data itself survived. A deep scan reconstructs files from their contents, so it can only guess the type, not the name. Sort by file type and preview to identify them.
Why did my recovered photo or document open corrupted?
Part of it was overwritten, or the deep scan could not tell where the file ended. Large and fragmented files suffer most. Sometimes a repair tool salvages a partially damaged JPEG or MP4; often it cannot.
Can I recover files after formatting a drive?
A quick format only clears the index, so recovery is frequently possible. A full format writes zeros across the whole drive and is not recoverable by software. Either way, stop using the drive immediately.
Will chkdsk help me recover deleted files?
No — chkdsk repairs filesystems, it does not undelete. It can also make recovery harder by rewriting structures. Run recovery software before chkdsk, not after.
Is it safe to recover files onto the same drive?
No, and this is the most common way people lose data during recovery. Writing recovered files onto the source drive overwrites the sectors still holding other deleted files. Always recover to a different drive.
What about files deleted from a network drive or NAS?
They do not go to your local Recycle Bin. Check the server or NAS for its own recycle bin and snapshots, which most NAS operating systems keep. If those are off, recovery means working on the NAS disks directly — a harder job than a local drive.
Where to get recovery software cheaper
Recovery and utility software is discounted more or less permanently, so there is rarely a reason to pay list price. Current codes:
- EaseUS coupon codes — Data Recovery Wizard, Todo Backup, Partition Master
- Wondershare coupon codes — Recoverit, plus the wider Wondershare suite
- AOMEI coupon codes — MyRecover, Backupper, Partition Assistant
- Drecov coupon codes — monthly, yearly and lifetime recovery licences
- Abelssoft coupon codes — Windows maintenance and backup utilities
- ACDSee coupon codes — photo cataloguing, worth having if the files you nearly lost were pictures
Related reading: best backup software for Windows, how to clone a hard drive to a new SSD, and the cheapest legitimate way to buy a Windows licence.